
Create AI Photos That Look 100% Real with MidJourney AI
Today I have a formula that will help you to create super realistic images in Mid-Journey super easy. You spend some time in Mid-Journey, and you can create some nice artistic things. You can also create images that look like realistic photographs. So here’s how you do it. To create images in Mid-Journey, I have a formula of seven things that you can fill in how you want, and you will create real-life looking images.
The first one is just a type of photography. I have a link in the description to this site that I’m showing right here. And here are a lot of examples from different kind of photography that you can use, super easy, and that you can just copy one that you like and paste it inside. So I’m a Type of Photography, Mid-Journey, and can do slash imagine. And I can paste in the whole process that I have, but we’re just going to start with type of photography first. And what I really like, I can go back to the area that we have here, and I really like astrophotography. So I got images from the stars, and here you see there’s also a genre of astro landscape photography that includes the Milky Way with a slice of Earth in the foreground. I’m just gonna try that one. I’m gonna do Astro landscape photography, and they’re just gonna take step by step, but first, only gonna do one, and I’m just gonna press enter. And now we filled in the first part of the seven steps that you can follow. So the astro landscape is loading, and I’m super curious. So here on the right, we have an example of how it can look like, how it should look like. So we have a piece of Earth here, some reflection, and the Milky Way in the top. And it actually looks really cool. It looks really nice. So we have the landscape, we have some reflection, and the Milky Way in the top. Okay, some have a planet that you cannot find on Earth. But this is already looking really good, and it really looks like an image. So some people add to the back of a prompt, like a photorealistic or realism and all that stuff. If you just have photography on the beginning of your prompt, then it’s all good.
After type of photography is lens. I have another site that shows a lot of different lenses, and here in the bottom, they say common lens sizes and specs, and they also give the description. So far right view of the world, great for landscape photography. They have 35 millimeters. It’s wide. 50. This is what the human eye sees in the world. So you can do different lenses to get different type of effects. I go back in the journey and put in the full formula. So I’m gonna go back to this one and look if there’s portraits. Yes. And what is nice of this site is that you have an example image, and in the bottom, you see, okay, they used a 34 mm lens. So I’m just gonna go for portrait, 34mm lens. Then I’m very curious what it comes up with. I didn’t give a subject or anything. We can always add that later. Now it just should make a portrait image with a 34 millimeter lens, an important photography with a 34 millimeter lens is ready. It’s looking very good, actually. It’s looking very realistic. It looks similar because the amount of sharpness that is on this picture in the face, it seems similar as this one. So now we can take the next step, and we can add the distance. And with distance, for instance, for portrait, it means that you can say full body or medium width. And the type of photography, I’m gonna do again a portrait. I’m gonna go for a 60 millimeter lens, that’s super wide, so we have a 60 millimeter lens and we’re gonna go for full body because a wide lens should be very good for full body.
Let’s see. Portrait photography 60 millimeter lens full body. And we have two that are full body. This one, not really. They got the camera though. And this one’s also good, but the face is a bit distorted. I’m gonna upscale and just see if it looks different after I upscale it because this happens with my journey. You sometimes need to upscale it before it gets a real good image. But while we’re waiting for the upscale, we can go to the next part, and that’s the subject. Of course, we want to add our own subject of what we want to see on the image. So I can do slash imagine, street photography, and I’m gonna go this time for street photography. I’m gonna go for 50 millimeter lens full body again. And the subject is going to be men sitting on the hood of a car. So this is where you’re gonna add what you actually want. Do you want the dog? Do you want the person? Do you want the building? All this stuff, you can add right here. So it’s really easy to create real life looking images if you use this formula. So here I have the street photography, 50 millimeter lens full body, men sitting on the hood of a car, and these are actually really good. The faces are a bit deformed with this one, especially the nose is not perfect, but we know that this is an issue from Mid-Journey right now. But this one, especially the car looks super real. What you really see is the depth of field, so it’s unsharp behind, and the person is that has to do with the 50 millimeter lens. So I think these look pretty good. And this one is upscaled. The portrait photography 60 millimeter lens full body and now the face is already looking more real. Upscaling definitely can help if you want a face that actually looks realistic. Then the next step is Direction. So if I go to slash imagine, so I’m going to go for street photography, 55 millimeter lens full body, person on skateboard in New York, and here’s the direction that you can add.
I wanted coming towards me, so facing towards me, and this is a formula so you can do how you want it yourself. Just add a couple of things that you want to change if you don’t want to use a certain lens and just see what Mid-Journey comes up with. That’s perfectly fine, you know. Okay, so it’s loaded, the street photography 55 millimeter lens full body person and skateboard in New York facing towards me. These two are not looking at me. This one also not. And this one doesn’t have a skateboard and so that’s, of course, with Mid-Journey, always have to do a couple of trials. It just looks like a super realistic image, so we already have the five of the formula, but the next one is super interesting. You can really do a lot, and that is the type of film. The most famous type of film is a Polaroid, so everybody knows how it looks like. It’s the square with the image in the middle. That’s how you can give it an authentic look. So you have different kind of films that use brown color, all stuff like that,
35 ml lens. I’m not gonna do any distance this time. I’m just gonna keep it out because I just want to see what Mid-Journey comes up with. The subject is going to be two girls celebrating on a birthday, and this time for type of film, I’m gonna use Polaroid. So here it’s loading. The fan photography, 35 millimeter lens, two girls celebrating on a birthday, Polaroid. And this is, it’s like it’s real, you know. It’s like this was really an image that got taken on a birthday party 10 years ago. Upscale one just to see how it looks because it’s still a bit wonky, but then the last thing that you can add to your images is the aspect ratio. And the aspect ratio is just what you use immediately normally. If you want it horizontally, if you want three by two, if you want it vertically, all this stuff, this you just add in the back. So for instance, for portrait photography, it’s very good to do two by three because then you have a bit higher than it’s wide. And you can also use three by two for the normal horizontal images. So I’m gonna try a black and white portrait. And you can add emotions as well if you want. So I’m gonna do portrait photography with a 50 millimeter lens, distance, I’m gonna do close-up.
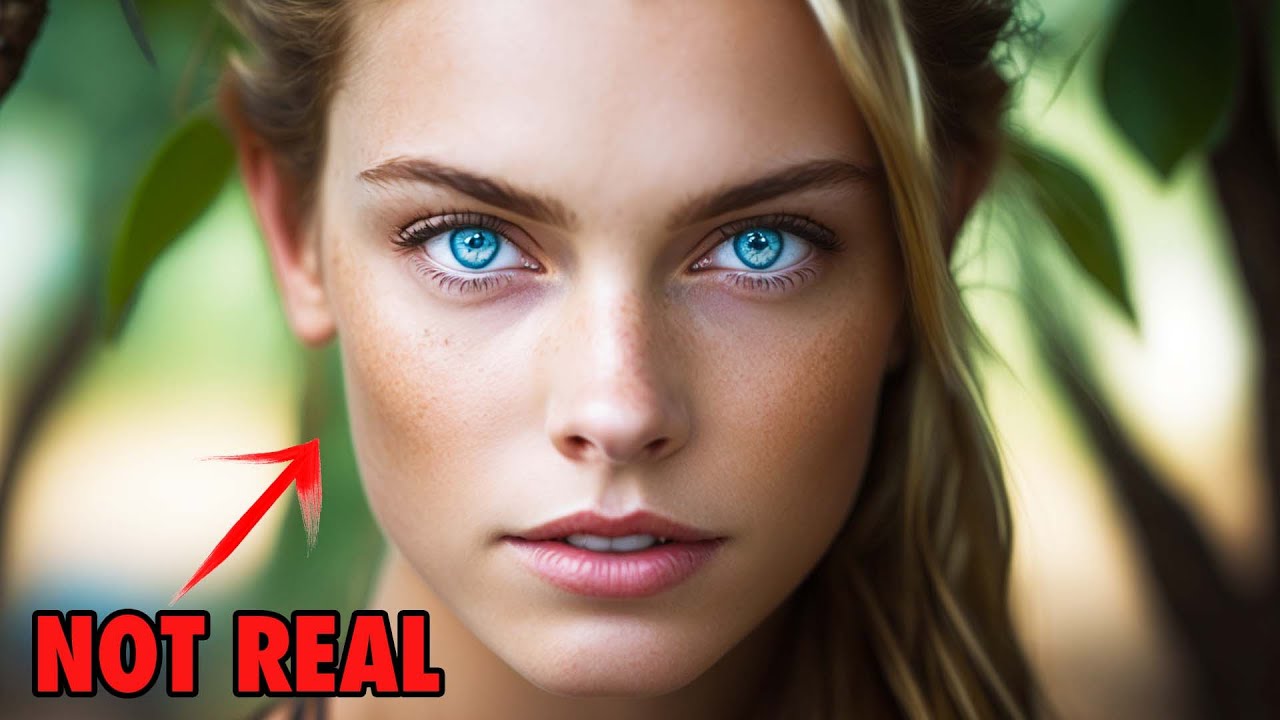
Subject is going to be a girl in her 30s. So this time for direction, I’m not gonna add what she’s looking at, but I’m gonna add how she’s looking. So this time I’m gonna do emotive eyes so that you really get the big eyes. Type of film I’m also not gonna add. And I’m gonna add for the aspect ratio, so I’m gonna do two by three for the portrait. See how it looks. And this one is upscaled. Okay, and the eyes especially, that’s with major and are really the issue that the eyes are very hard to get right, but for the rest, it’s super good. It really looks like a Polaroid with the balloons. They are two girls on a birthday party. This looks like a real image. It was finished. It’s actually not looking bad. And you see the emotive eyes that you really got the big eyes and the 50 millimeter lens really is made for this part of photography. And the aspect ratio of 2×3 is much nicer for portraits than any other aspect ratio. While this is loading, I want to show another favorite of mine. What I really like is tilt-shift photography. Tilt-shift photography is so specific that you don’t need to add a lot of things. Amsterdam Sunset and I want 3×2. You can see that you can just take what you want in this formula, mix it around for however fits it for you.
Another one that’s super nice from cities is long exposure photography. I’m gonna do long exposure photography, Long Exposure New York, New York at night. Okay, this one is finished, and it’s looking, I mean, come on, this looks super good. It looks like real people, looks very realistic. And this is how you can create super realistic images with Mid-Journey. Okay, tilt-shift of Amsterdam is ready, and this looks super good. This just looks like my city, and it’s super realistic, and it really looks like Amsterdam. This is super cool. Here we have the long exposure photography in New York at night, and this is also looking very, very good because you have to sit in New York, and you have the long lights from the long exposure. These ones also came out very well. I think it’s so much fun to create these photos inside Mid-Journey. It’s different than what we normally do, but it’s just a lot of fun to experiment with, and with this formula, it’s so easy to get it right. Just add a bit there or change it there, and you will get amazing results.
I have another video showcasing another AI generator that can do things that Mid-Journey cannot even do. It’s a lot of fun. You can watch it here. And otherwise, see you next video.

